
How To Make Great Video Content On A Budget
Struggling to produce video content, and want to bump up your reach? Read our easy how to guide on creating video content on a shoestring budget. Read on here.
Good quality video content. It’s the golden goose of digital marketing and a modern necessity for any brand that wants to compete with the social media big boys.
And despite most video content makers charging an arm and a leg for their services, good content isn’t expensive or difficult to create.

If you’re going out to shoot and need to hire equipment, that’s different, but if you just want something that makes your product stand out on a FB feed, then keep reading.
I’m about to reveal the magician’s secrets.
FOUR WAYS TO CREATE VIDEO CONTENT FOR UNDER $100.
The Cinemagraph:

A cinemagraph done well can be a beautiful thing to witness. Which is why some videographers will charge you a good $500 plus for one.
But a cinemagraph done using a mug, a teapot, an iPhone and five minutes isn’t far behind it.
I made the above capture using the free iPhone app called cinemagraph.
Here’s how:
Step 1: Set up a tripod (or ask somebody nicely to hold your phone very still) and begin recording. I asked someone to hold the phone!
Step 2: Record a scene that has at least two moving components.
Step 3: Download and then open the cinemagraph application.
Step 4: Import video into cinemagraph. Use the pen tool to draw a white area over the image you’d like to animate.
Click “preview” to see your progress.
If it’s too wide, use the eraser to remove the excess.
When you’re done, click the save button in the top and export as an MP4 or a GIF.
The Zoom Video:
Ah, iMovie. You are one overlooked piece of free software.
Cost: $0
App used: iMovie.
Device used: Macbook.
Skill Level: Beginner.
I often employ this kind of video content for clients who are product focused. I generally use Adobe’s Premiere Pro as it gives you greater control, and exports into a higher quality, BUT, that’s not to say you can’t do it on the cheap for a similar outcome.
I made the above capture using iMovie.
Step 1: Open iMovie.
Step 2: Import image.
Step 3: Drag image from the Event Library into the Project Area. iMovie will automatically change your still image into a video, and you will be able to hit play to watch it pan across the image.
Step 4: Click the highlighted “crop” square, and two boxes, outlined by white lines will appear.
Step 5: Move the “Start” and “End” boxes around as this allows you to control where that panning effect begins and ends.

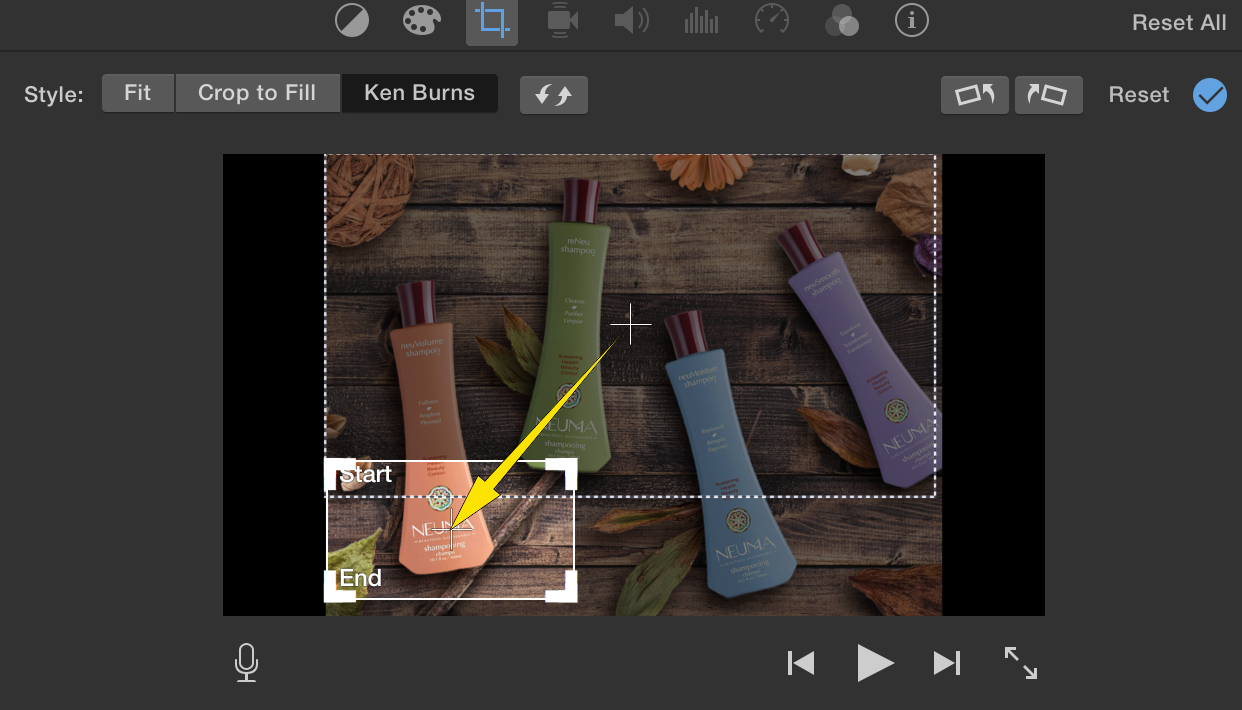
Step 6: Click share, click file, and iMovie will save it as an mp4. Easy!
The Stop-Motion
Cost: $72.59 per month – complete Adobe subscription. Free if you use their free trials. 😀
Apps used: Adobe Premiere Pro & Adobe Photoshop.
Device used: Macbook/Laptop
Skill Level: Intermediate
Stop motions are a super cute and effective ways to highlight your product. They’re also incredible time-consuming and therefore expensive to create.
Unless… You do it our way. B)
A classic stop-motion will be created by a photographer setting up a tripod, and taking a single photo after every inch of movement. The photos are then placed one after another in a video software to create a moving image.
If you’re getting billed by the hour, you’re looking at a 5+ hour shoot, and at least 3 hours editing time. Exxxy.
Here’s how you can DIY your stop-motion for the cost of your subscription, or free, if you make use of their free
trials. Yes, you could use after effects to move each item on the page in a nice fluid motion, but that wouldn’t create the jagged motion of stop-motion videos that we all know and love.
The Photoshop Part
Step 1: Open photoshop, create a background layer and colour it.
Step 2: Create a new layer, and add a cut-out image of the product.
Step 3: Create a new layer, and add another other thing (leaf).
Step 4: Keep adding objects in new layers until you’re happy with the image.

Step 5: Click one of those little leaves. Move it like an inch upwards, slightly out of frame. Now repeat with the adjascent object, in this case the ribbon.
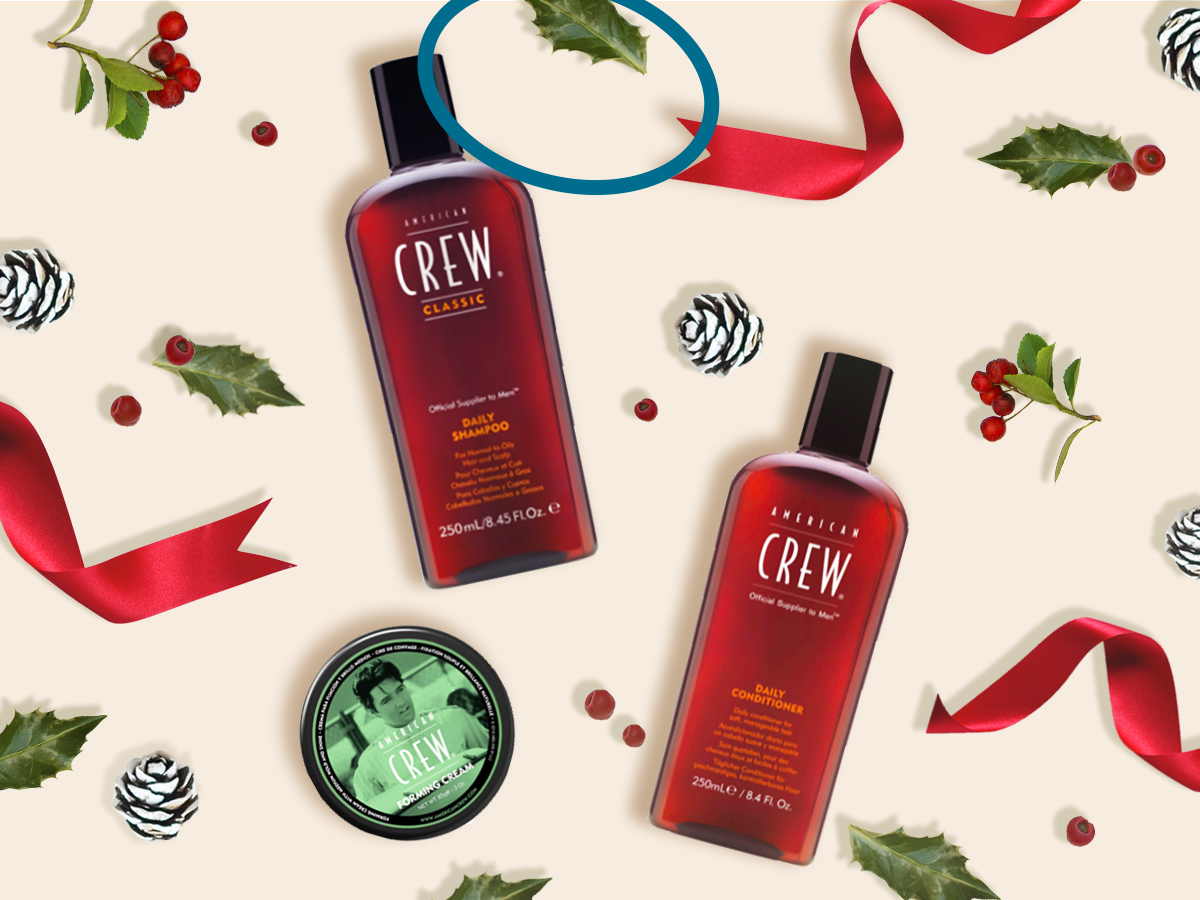
Step 6: Continue working clockwise around the screen until everything has moved slightly. You want to ensure everything is slowly moving off screen.
Step 8: Export the image as an PNG and save. This is your first capture. You will do around 50-70 more of these so settle in. Fun. Fun. Fun.
Step 9: Move everything on the screen again slightly, save, and export. Continue doing this until every little bit and bob has left the screen. You will eventually end up with this.
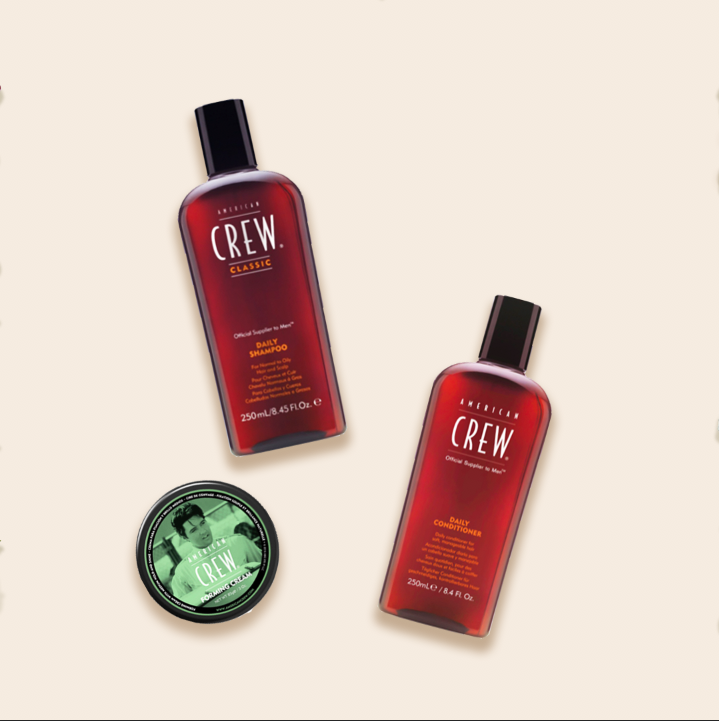
Congratulations, you made it through the Photoshop part!
The Premiere Part:
Step 1: Import all your files into Premiere.
Step 2: Pull each clip onto the project line, starting with the LAST one you saved, where the image was empty except for the products.
Step 3: Add each additional clip, until you end with all the products back in the middle.
Step 4: Shorten each clip’s duration to around a couple of seconds.
Play and enjoy!
The Video on a Still Image
Cost: Adobe subscription ($72.59 per month) & iStock Image ($12)
Apps used: Adobe Premiere Pro
Device used: Macbook / Laptop
Skill Level: BEGINNER, BABY.
Good lawd is this a fun one and super easy. All you need is some video footage, a still image and Adobe Premiere Pro.
Here’s how I did it…
Step 1: Open Premiere Pro.
Step 2: Drag a photo from your desktop/or import it into the project area. It will become around 5 seconds of footage. Click it, extend to however long your video is.
Step 3: Drag video and/or import into the project area. Pull it into the track above your photo, to make it the top layer. Click it.
Step 4: Uncheck “uniform scale” in the effects control, so you can adjust the video with no limits.
You’re done.
No, seriously. You’re done.
If you CBF reading that, you can watch me do it here:
Stay tuned for our How To Create Free Music That Doesn’t Sound Like Generic Garbage post. It’ll be a banger.
Of course if all this looks too hard and you want someone else to create beautiful video content for your brand, Hello Social would love to help so please hit us up. Peace.