The Idiot’s Guide to Facebook Custom Audiences for Remarketing Advertising
Learn about Facebook custom audiences, and how they can supercharge your remarketing strategy. Covers all audience types, how to set them up, and when to use them. Read this and get more Facebook advertising tips by subscribing to Australia's number one social media marketing blog.
Even the most inebriated hillbilly can muster the mental capacity to set up some basic remarketing advertising for their Facebook page. So join me marketing masters and morons alike, and let’s build some custom remarketing audiences!
In this article we cover the basics of how to use custom audiences for remarketing, and then go a step further to dig in a little deeper and segment our web traffic and build some more targeted ads, and explain all the different types of custom audiences available. Yeehaw!
What in tarnation are custom audiences?
If you’ve created a Facebook ad before, you have created an audience. This is the demographic, interest, geographical, and other restrictions that you can apply to your ads from the Ad Set level.
Regular audiences are great, but sometimes you want to get a little more specific than just fans of your page, or those that “Like” latex and dog costumes. That’s where custom audiences come in handy.
Custom audiences allow you to restrict your ads to show only to a list of users that you have essentially imported into Facebook from an external source. The most common example of this is the standard website visitors remarketing audience, but there are more powerful options available.
How do I get me one of them fancy custom audiences?
To create a new custom audience, or to edit an existing one, you must navigate to the Audiences page, which falls under Assets in your business manager account.
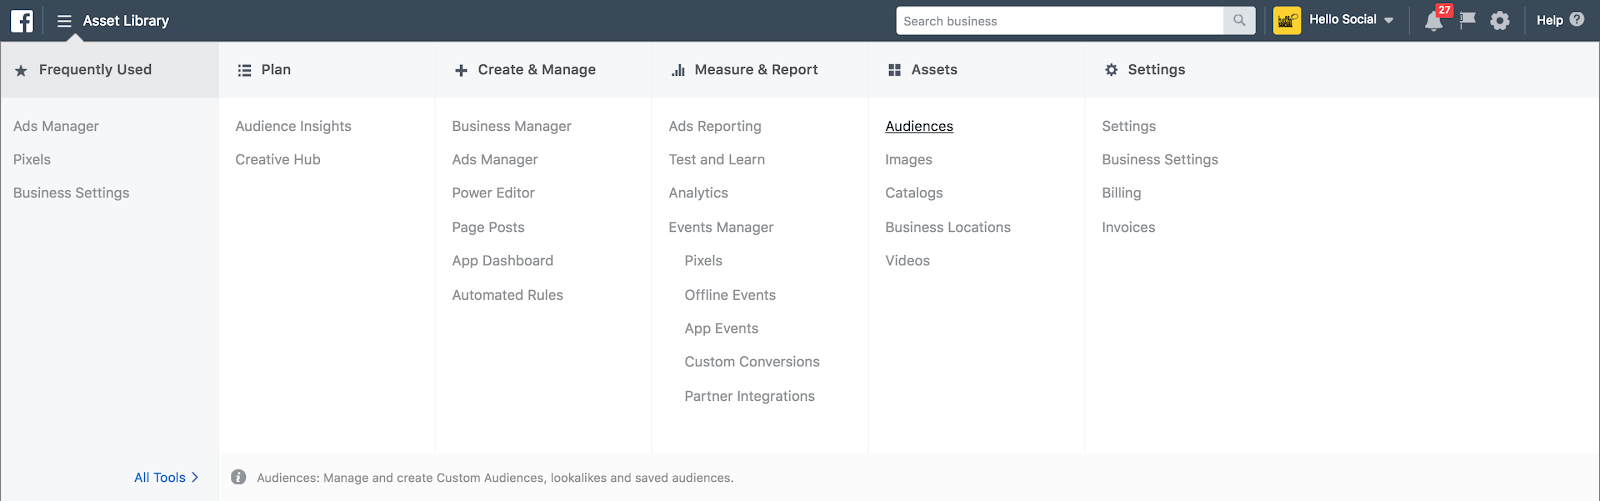
When you click on the button to Create Audience and select Custom Audience you can choose from five options.

Custom Audience 1: The Customer File
The Customer File option allows you to import a list of email addresses, commonly a newsletter mailing list, which will then be cross-referenced with Facebook’s own database to create an audience from all users that match. Note that it’s unlikely that your whole list will be matched as your users may have a different email address associated to their account.
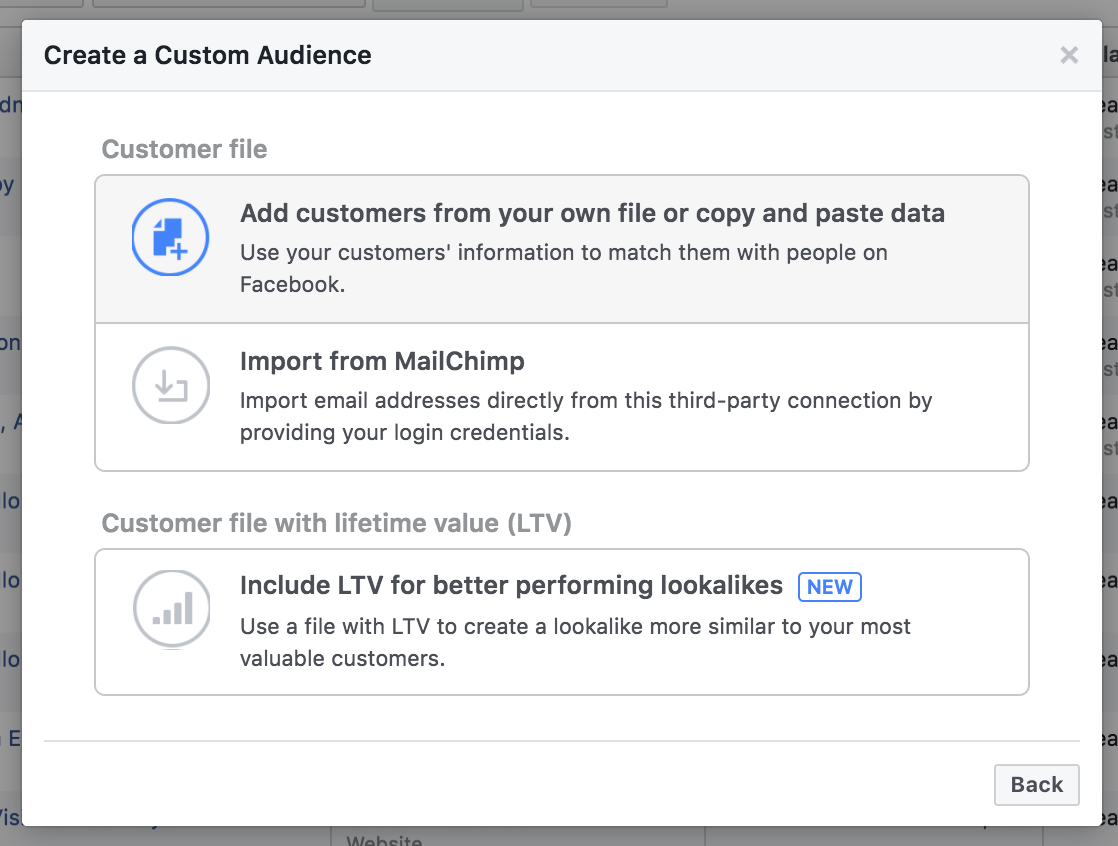
You have the option to import from a file upload/copy and paste (basically a spreadsheet format), or import directly from Mailchimp if you are using them as your email tool. The last option allows Facebook to associate a life time value to your imported contacts, which can help identify loyal customers for e-commerce companies.
Most businesses will opt to upload their own file at this point. Facebook suggests that you include email address, country and phone numbers where possible, as all of this information can be used to match users. There’s also a template you can download during the setup process, which can help you correctly format your sheet.

Even if your whole list is from one country, including the country column is recommended as it helps to get more positive matches.
You should also be sure to include the international dialling code for any phone numbers, and you can even add up to three different email addresses for a single contact in separate columns.
Once imported the list should populate immediately and it will be ready to use in your advertising.
Custom Audience 2: Website Traffic
By far the most commonly used custom audience, the website traffic option gives you the classic remarketing (or retargeting if you’re that way inclined) audience.
You don’t need to install any tracking other than your existing Facebook pixel in order to track those that visited your site. However, if you want to target those that completed specific actions on your site, you will need to be sure that those actions are being tracked as custom events. This is handled in your pixel settings.
For most businesses, the out-the-box visitors option is a good start, and a piece of piss to set up. Just select the option, then lift your six fingered club hand up and pound the keyboard until you accidentally type a name for your audience.
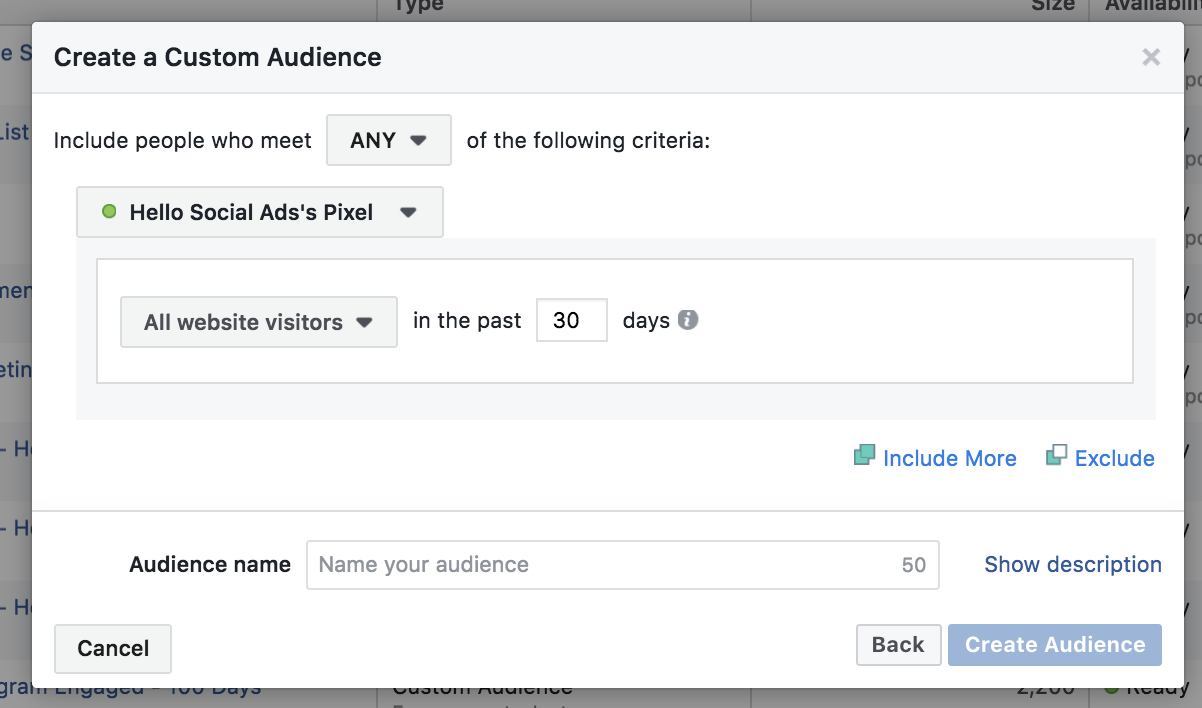
If you’re feeling especially dextrous you could customise the number of days that a user remains in your audience before they are flushed for inactivity. Note that longer is not always better, despite making your list larger! Generally I won’t go about 90 days, but it depends on how long your purchase/conversion cycle is.
You can also create custom audiences for visitors to specific pages or groups of pages on your site. This is a great way for businesses that are not online shops to target custom content that is relevant to what your users browsed on your site, in a way that’s a bit like the dynamic remarketing features available to e-commerce sites.
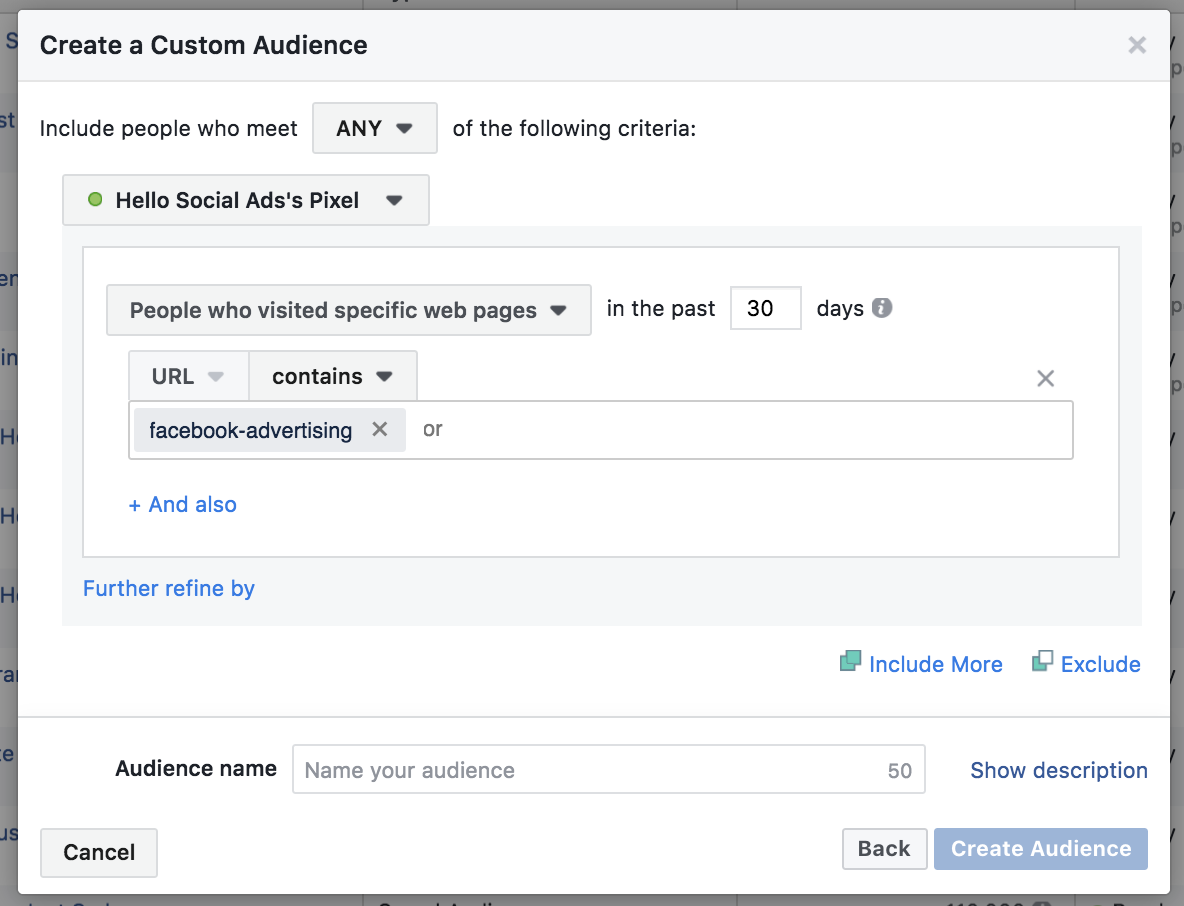
In the above example, I’m creating a custom remarketing audience for those that visited our Facebook Advertising service page. I’m targeting users that landed on a URL containing the string “facebook-advertising”, but I could add multiple rules here. Once the audienc
e has collected enough data, I’ll setup a seperate remarketing Ad Set for this custom audience featuring links to useful blog articles like this one about Facebook ads!
Hot tip! With the website traffic option, your audience will take time to grow. If you begin running your ads with a high budget and only have two visitors on that day, you are going to pummel those two people with ads. Wait for your audience to grow, and then start your ads, managing the frequency by adjusting the pay per click bid for your ad set.
Custom Audience 3: App Activity
This audience works very much in the same way as the website traffic option described above, and will also require you to install your Facebook pixel on your app.
Not all apps are page based, so you may be heavily reliant on custom events to target users engaged in specific behaviours. Unfortunately there’s no quick fix for this setup, as events always need to be manually tagged, but tag management tools like Google Tag Manager can make event tracking a lot easier without having to rely on developers for every code.
The awesome video tutorial from our buddy Julian Juenneman at Measure School explains how to fire custom events using the Facebook pixel with GTM. You can also hear more from him by reading our interview with him on the topic of Youtube marketing.
Custom Audience 4: Offline Activity
Again, this option requires some custom events, so whether or not you can use it will depend on whether you have already set them up!
Offline events take your customer files or mailing list data even further, transforming it from a static file, to one that can be updated with nuanced data over time.
An awesome use for this feature is to help lead based businesses attribute revenue to their contact conversions, as you can associate an offline purchase event with revenue value to a contact (using email, phone, country, etc) and match it to Facebook data which will attribute the sale to the specific ad that lead to the initial contact. This feature is even ahead of Google Analytics!
It’s also great for event attendees or retailers, so if you have an eagle eye on your customers you can be an offline event ninja, enriching their data profile with every action.

I digress. These offline conversions can also be used to build a custom audience, of for example users that purchased offline, or attended an event twice, or just about whatever you like.
For more information on setting up offline events, check out the Facebook documentation.
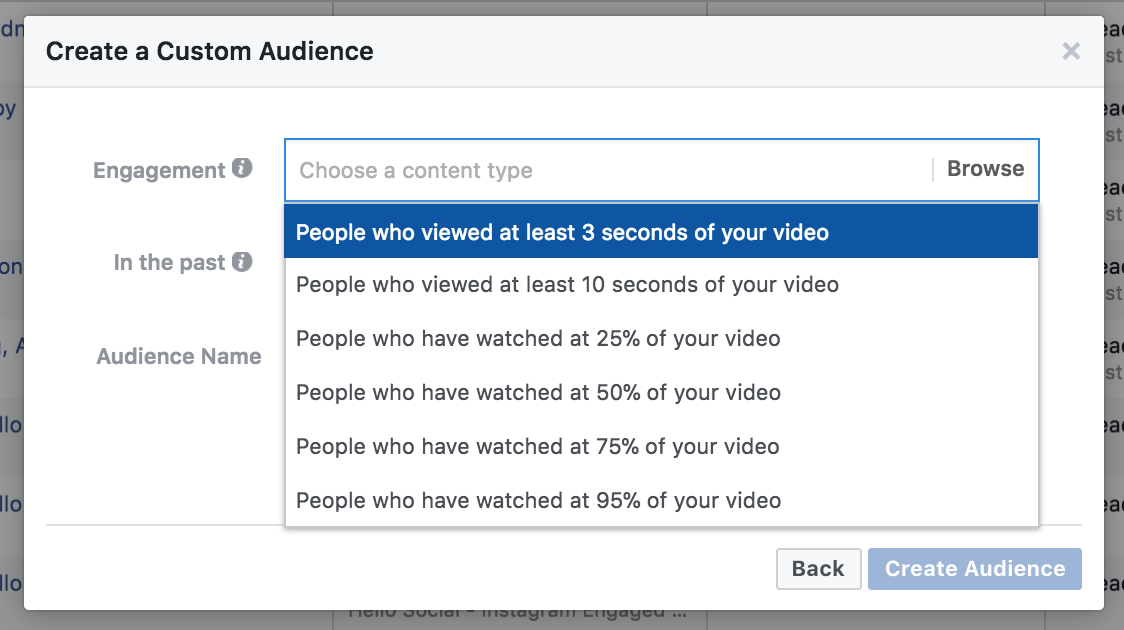
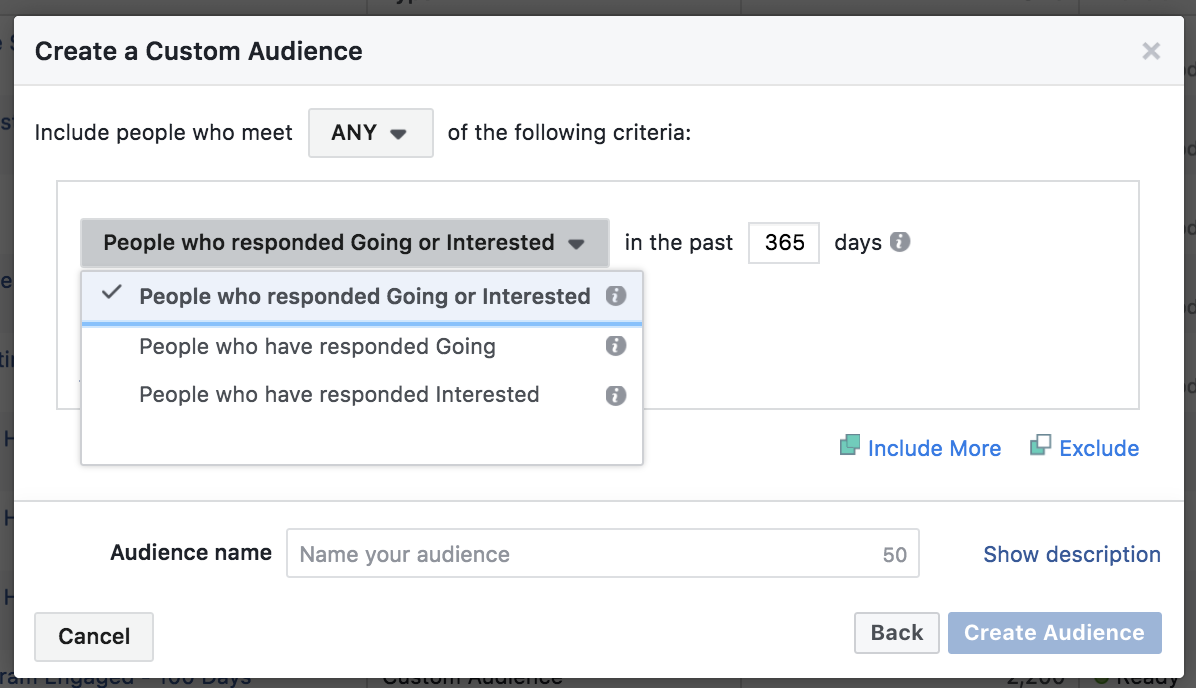
Custom Audience 5: Engagement
Last but not least we have the Engagement custom audience, allowing you to remarket ads and content to users that have previously engaged with specific post types in the past.
There are a variety of options available here, with a bunch of new ones available for 2018.
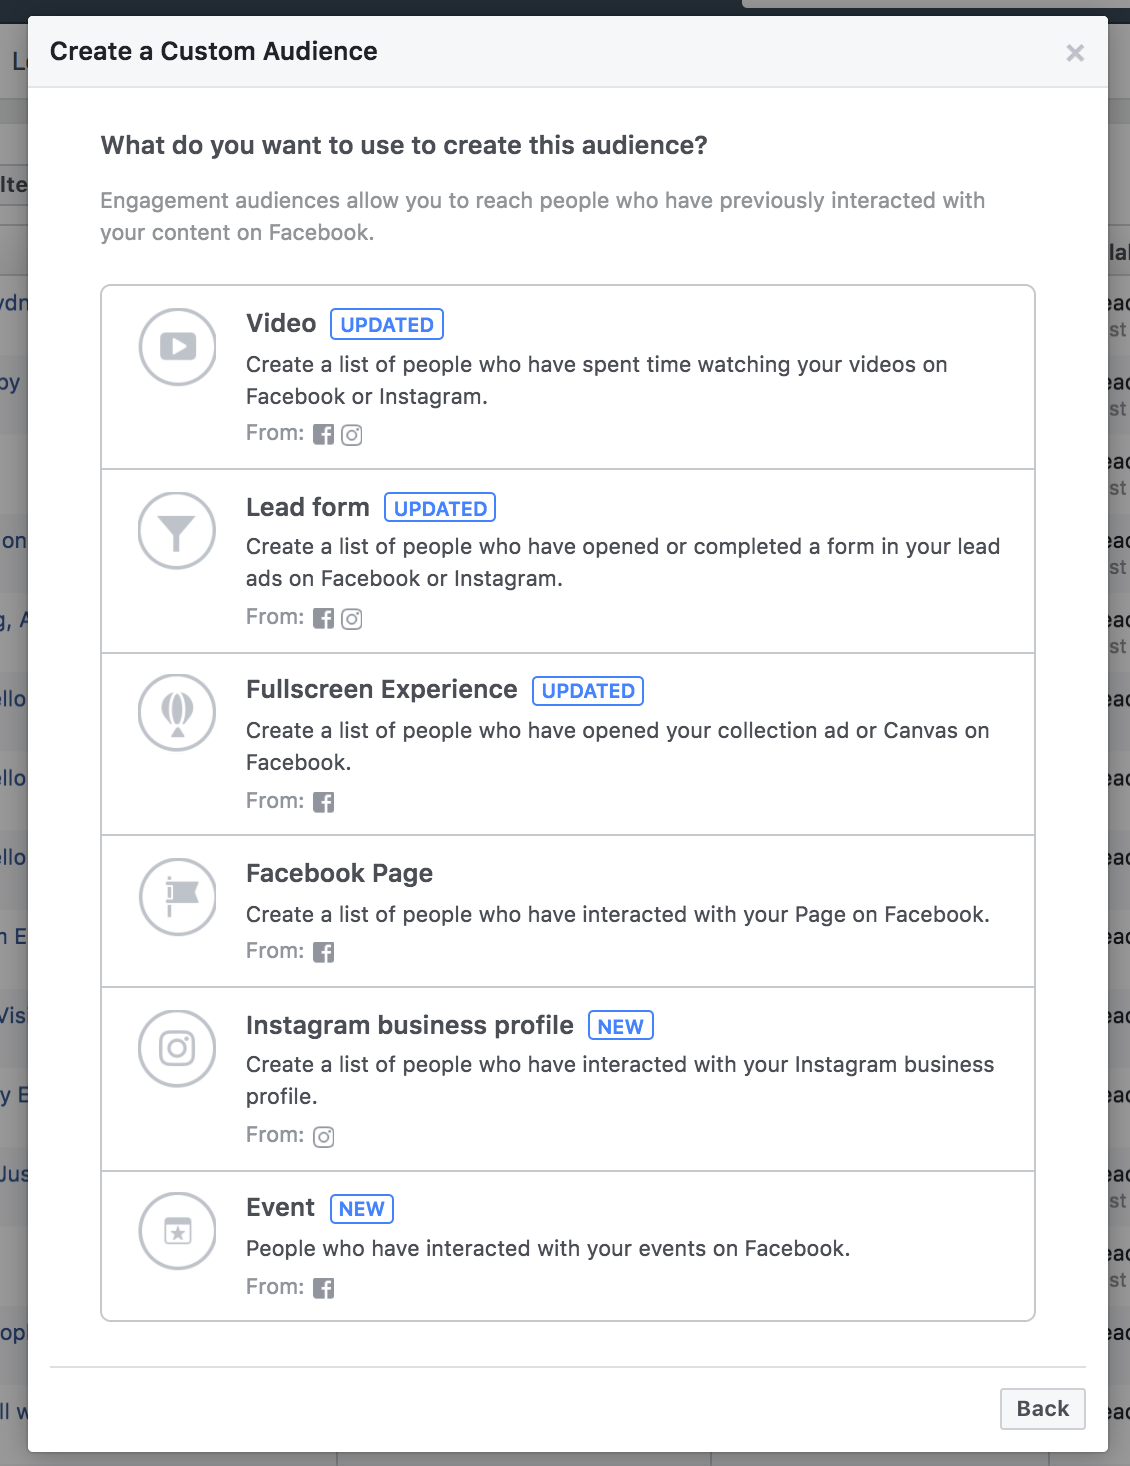
Each option can be further refined to target just a segment of each audience. If you’ve followed this article so far, you should be able to work out how each of these works, so I won’t cover every single one.
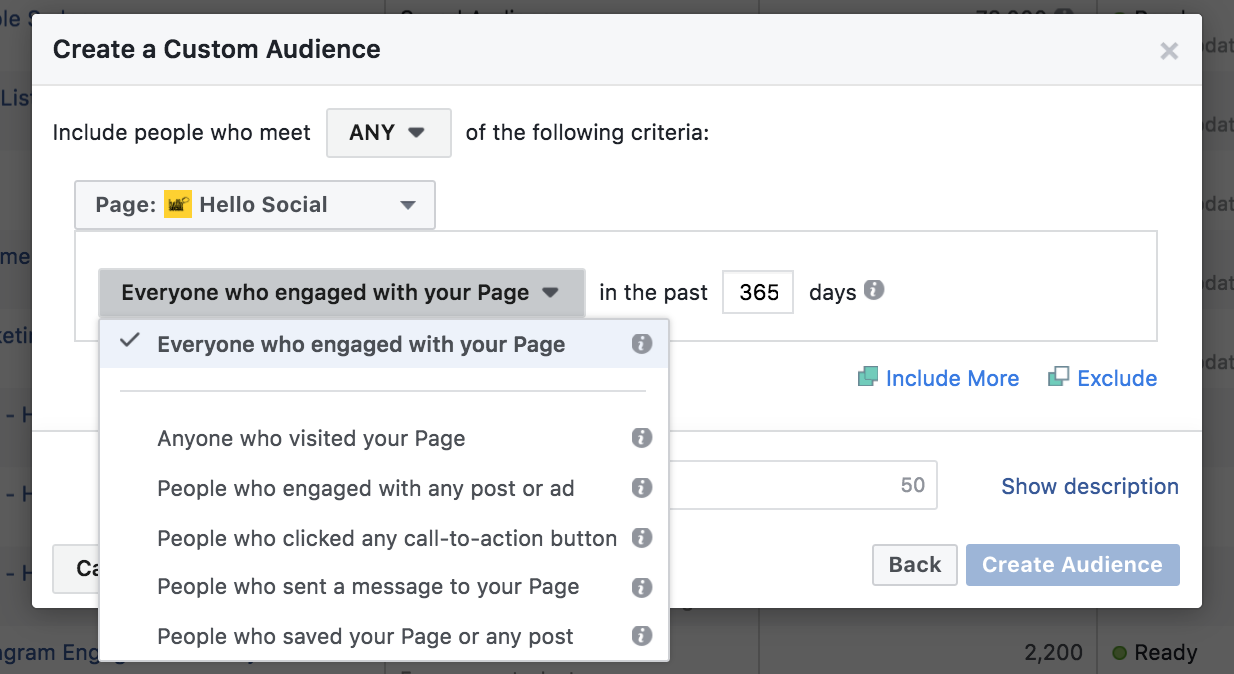
Engagements with pages on Facebook or Instagram can be targeted specifically or in general, ranging from CTA clicks to messages, likes and visits.
Custom audiences can be built from groups of users that watched a specific video, or any video for a specific duration. This can be great for brands using specific product placement in their videos.
Or for events, you can create custom audiences out of attendees or those interested. Again date ranges are available, and specific events can be targeted. Pay attention conference organisers!
Thankfully, all of this data is collected on the Facebook platform, and doesn’t require any additional tracking, or any changes to your pixel installation, making this form of remarketing easy to set up. Not to mention that Facebook has already been collecting all of this data, so you don’t need to wait for your audience list to populate. Just a few clicks and you’re there.
Now what?
Go bananas and create your audiences. The more the merrier! They will be available when you are configuring your ad set when you click on the box labelled Custom Audience. You can also add location and interest targeting to refine your audience further if needs be.
Try to think strategically about what kind of content appeals most to each of your audiences, and like with any campaign it helps to have a strategy or rough plan written down first so that everything ends up being labelled up nicely and organised.
If you need some help on creating your audiences and ads, then get in touch with the Hello Social team and we’ll concoct a killer mix of remarketing mastery that will leave your competitors looking toothless, moonshine blind and generally inbred.